Building Freebie Binder: image moderation with Amazon Rekognition
Are you into K-pop? If so, you probably know BTS. A friend of mine tried to get tickets for their concert in Peru, didn't manage to, and ended up flying to Chile to see them.
While she was planning the trip, she told me that at the concerts fans give each other small handmade gifts called freebies: photocards, stickers, bracelets. After that conversation, my social feeds started showing me videos of fans handing them out, and in several of them people said they couldn't remember who had given them each one.
That felt like a problem with a simple fix: every freebie should carry the name of the person who made it. So before the concerts I built Freebie Binder. Each fan uploads a photo of their freebie and shows its QR code, and whoever receives it scans the code to save it in their binder along with the giver's name.
Since anyone could upload photos that other people would see, I wanted a safety layer to keep inappropriate photos out. I used Amazon Rekognition for that, and in this post I'll show you how I wired it in and what I chose to block. All the code is in codeanding/freebie-binder if you want to deploy it to your own account.
This post was first published in Spanish on AWS Builder Center.

How does Freebie Binder work?
Before getting into Rekognition, it helps to see how the app is put together, because where the check happens depends on the path each photo takes:
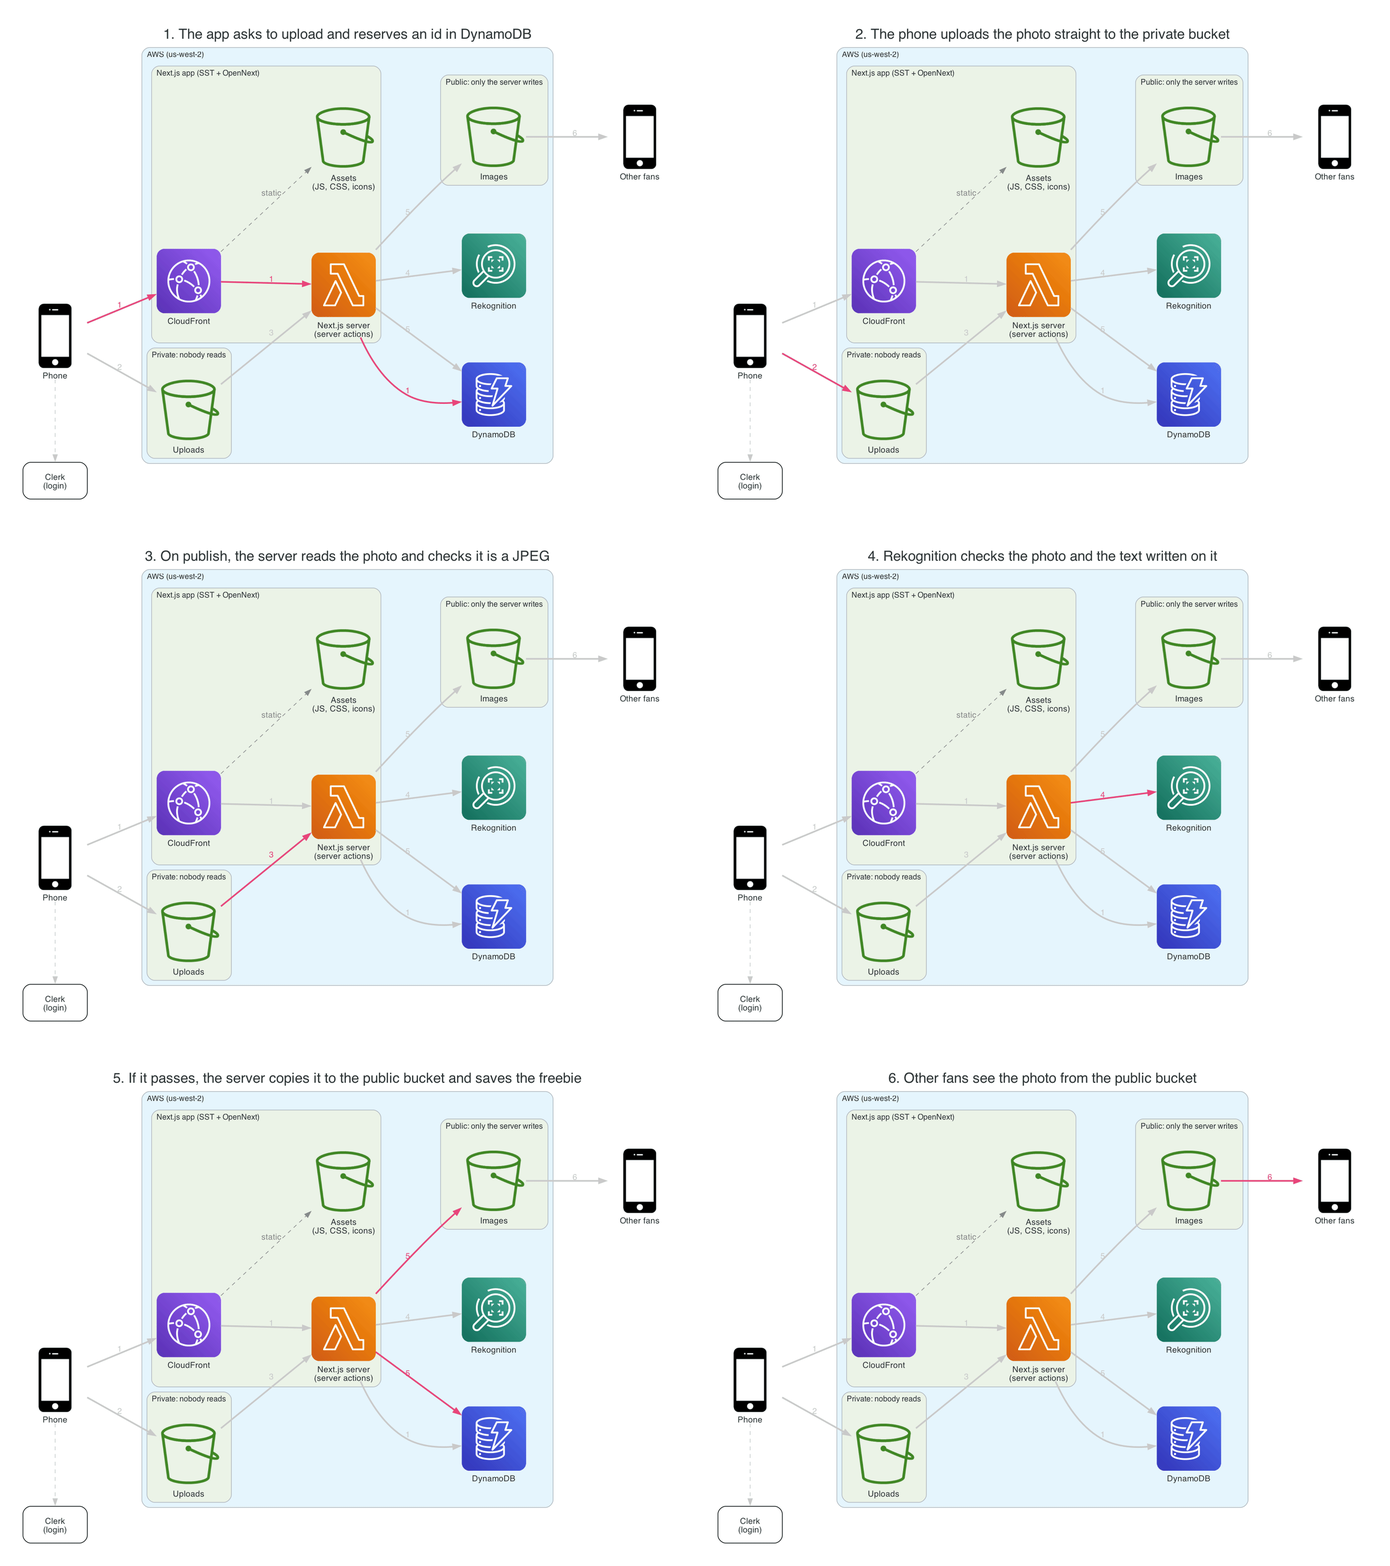
Diagram made with diagrams (Python).
- Clerk handles sign-in.
- CloudFront is the front door: it serves static files (JS, CSS, icons) from an S3 bucket and sends everything else to Lambda.
- Lambda runs the Next.js server: dynamic pages and server actions. Everything the browser shouldn't do happens here, like signing uploads, reading the private bucket and calling Rekognition.
- DynamoDB stores profiles, freebies and each upload reservation.
- S3
Uploadsis the private bucket the phone uploads to. Nobody can read it from outside. - Amazon Rekognition checks the photo, and any text written on it, before it's published.
- S3
Imagesis the public bucket. Only the server writes to it, after the check.
I deployed the whole app with SST, which uses OpenNext under the hood to run Next.js on Lambda. Why Lambda? It bills per invocation, which fits traffic that spikes on concert nights. And so the first visitor doesn't wait for a cold start, SST keeps three instances warm with its warm option.
With those pieces, a photo goes through six steps from the phone to other fans' screens:
- The app asks to upload and reserves an id in DynamoDB.
- The phone uploads the photo straight to the private bucket.
- On publish, the server reads the photo and checks that it's a JPEG.
- Rekognition checks the photo and any text on it.
- If it passes, the server copies it to the public bucket and saves the freebie.
- Other fans see the photo from the public bucket.
What is Amazon Rekognition?
Step 4 is what this post is about. Amazon Rekognition is the AWS service for analyzing images and video with pre-trained models, and for photo moderation I used two of its operations: DetectModerationLabels for what the image shows and DetectText for text written on it. Let's start with the first one.
The idea is simple: you send it a JPEG or PNG and it returns a list of labels, like Violence or Explicit, each with a confidence score from 0 to 100. Labels follow a three-level taxonomy where, for example, Explicit (level 1) contains Explicit Nudity (level 2), and each label comes with its Name, ParentName and TaxonomyLevel. Rekognition only returns labels; your code decides whether the photo gets published.
If you want to try it before writing any code, the Rekognition console has a moderation demo with sample images. You can also use the CLI with one of your photos:
$ aws rekognition detect-moderation-labels --image-bytes fileb://photo.jpg --min-confidence 60
Wiring it into the app
Once you've seen what it returns, connecting it takes very little code. In Freebie Binder, the content check lives in two functions (we'll look at the BLOCKED list in the next section):
import { DetectModerationLabelsCommand, RekognitionClient } from "@aws-sdk/client-rekognition";
import { AWS_REGION } from "./aws";

const rekognition = new RekognitionClient({ region: AWS_REGION });

export function isBlocked(labels: { Name?: string; ParentName?: string }[]): boolean {
  return labels.some((l) => BLOCKED.includes(l.Name ?? "") || BLOCKED.includes(l.ParentName ?? ""));
}

export async function imageIsSafe(bytes: Uint8Array): Promise<boolean> {
  const res = await rekognition.send(
    new DetectModerationLabelsCommand({ Image: { Bytes: bytes }, MinConfidence: 60 }),
  );
  return !isBlocked(res.ModerationLabels ?? []);
}
Three details are worth pointing out:
Image: { Bytes: bytes }sends the bytes the server already read from the private bucket, so Rekognition never receives a public URL.imageIsSafeonly returnstrueorfalse, because the app only needs to know whether to publish the photo.isBlockedchecks bothNameandParentName. That way, a level-2 label also counts when its level-1 category is blocked.
Which categories should you block?
The part that changes most from one app to another is the BLOCKED list. In Freebie Binder it ended up like this:
const BLOCKED = [
  "Explicit",
  "Non-Explicit Nudity of Intimate parts and Kissing",
  "Violence",
  "Visually Disturbing",
  "Hate Symbols",
  "Rude Gestures",
];
They're all level-1 categories. There's no need to list level-2 ones, because the response always includes the level-1 category alongside them.
Since the photos are public, the list covers nudity, violence, disturbing content, hate symbols and offensive gestures. Other categories in the taxonomy were left out. The table shows both:
| Category | Blocked? | What it covers |
|---|---|---|
| Explicit | Yes | Explicit nudity and sexual activity |
| Non-Explicit Nudity of Intimate parts and Kissing | Yes | Partial nudity and kissing on the lips (Kissing on the Lips), so a photocard with a kiss is blocked too |
| Violence | Yes | Weapons, physical and graphic violence, self-harm |
| Visually Disturbing | Yes | Corpses, emaciated bodies and air crashes |
| Hate Symbols | Yes | Nazi, white supremacist and extremist symbols |
| Rude Gestures | Yes | The middle finger |
| Swimwear or Underwear | No | Swimwear and underwear |
| Alcohol | No | Alcoholic drinks and people drinking |
| Drugs & Tobacco | No | Pills and people smoking |
| Gambling | No | Casino games |
That said, another app would need a different table, so check the full list of labels before copying mine.
What MinConfidence should you use?
Is picking categories enough? Not quite, because there's a second knob: MinConfidence, the minimum confidence a label needs to show up in the response. It measures how sure the model is about that label; it doesn't tell you how much of the image is inappropriate.
If you don't set it, Rekognition returns labels at 50 or above. According to the docs, going below 50 gives more false positives and going above gives fewer.
Freebie Binder uses 60, slightly above the default. Watch the direction here: a higher value makes Rekognition return fewer labels, so fewer photos get blocked. If your priority is that nothing inappropriate gets through, lower it; if you're worried about blocking innocent photos, raise it.
What about text written on the photo?
A photocard can have a phone number or a WhatsApp username written on it, and DetectModerationLabels doesn't read text. That's what DetectText is for: another Rekognition operation that returns the lines and words it finds in the image.
In Freebie Binder, lines with a confidence of 80 or more go through the same function that checks the title and description, textIsSafe(), which blocks links, phone numbers and messaging app names:
export async function imageTextIsSafe(bytes: Uint8Array): Promise<boolean> {
  const res = await rekognition.send(new DetectTextCommand({ Image: { Bytes: bytes } }));
  const lines = (res.TextDetections ?? [])
    .filter((t) => t.Type === "LINE" && (t.Confidence ?? 0) >= 80)
    .map((t) => t.DetectedText ?? "");
  return textIsSafe(...lines);
}
Does it work? I tested it with a demo photocard that had "WhatsApp 987 654 321" written on it, and the app rejected it with the same message it uses for the form. The same photo without the text was published just fine.
One caveat: the phone rule looks for seven or more digits in a row, so a date like 2026.11.16 written on the photocard gets blocked too.
When does the check happen?
So far we've covered what Rekognition checks. But how do you keep a photo from being seen before it passes? That's why the app uses two buckets.
First, the browser converts the photo to JPEG with a canvas and uploads it to the private bucket (Uploads) with a signed POST that only accepts files declared as JPEG, up to 2 MB, and expires after 2 minutes. While the photo is there, nobody can see it from outside. Then, when the person publishes, the server reads the bytes, checks that it really is a JPEG and passes them to Rekognition. Only if both checks pass does it copy the photo to the public bucket (Images). Either way, the original is deleted from the private bucket.
In code, the server action that publishes looks like this (trimmed):
const bytes = await readUpload(id);
await deleteUpload(id);
if (!bytes) {
  return { error: "image" };
}
const [imageOk, imageTextOk] = await Promise.all([imageIsSafe(bytes), imageTextIsSafe(bytes)]);
if (!imageOk) {
  return { error: "moderation" };
}
if (!imageTextOk) {
  return { error: "text" };
}

await publishImage(`freebies/${id}.jpg`, bytes);
await createFreebie({ /* ... */ });
Both checks run in parallel on the same bytes, so you only wait for the slower one.
What if Rekognition fails with an error or throttling? Then the server action fails and the photo isn't published either. The person has to upload it again, but in exchange no photo ever goes public without being checked.
Permissions
For all of this to work, the Lambda only needs two Rekognition permissions, which fit on one line in sst.config.ts:
{ actions: ["rekognition:DetectModerationLabels", "rekognition:DetectText"], resources: ["*"] },
What doesn't Rekognition catch?
Even with all this, Rekognition only checks what's visible in the image, and the AWS documentation itself says it isn't an exhaustive filter for inappropriate content. In Freebie Binder that leaves these gaps:
- Context. A photo can look fine according to the labels and still not belong. For those cases, anyone with an account can report a freebie, and at 3 reports it hides itself.
- False positives. What if Rekognition blocks an innocent photo? There's no appeal for now, so the only option is to upload another one.
And what happens if a photo passes the check and nobody reports it? For that I built a moderation panel for admins only. The role lives in my user's publicMetadata in Clerk, which can only be set from the backend, so nobody can grant it to themselves from the browser. The server checks it before showing the panel, and if you're not an admin, the page doesn't exist. From there I see the most reported freebies first and can hide them, show them again or, once hidden, delete them.
export async function requireAdmin() {
  const { userId } = await auth();
  if (!userId) {
    redirect("/sign-in");
  }
  const user = await (await clerkClient()).users.getUser(userId);
  if (user.publicMetadata?.role !== "admin") {
    notFound();
  }
  return { id: userId };
}

The panel with demo data.
How much does it cost?
Freebie Binder makes two calls per photo, and both DetectModerationLabels and DetectText are in Group 2 of the Image APIs. The 12-month free tier includes 1,000 images per month in that group, and after that the examples on the pricing page use USD 0.001 per image for the first million. Two calls means each photo costs twice as much, but for a fan app at a handful of concerts it's still very little.
Prices vary by region, and since July 15, 2025, new accounts get the free tier as credits.
How can I try it in my account?
To deploy it, you need an AWS account with the CLI configured and a Clerk application:
$ git clone https://github.com/codeanding/freebie-binder.git
$ cd freebie-binder
$ pnpm install
$ cp .env.example .env.local   # your Clerk keys
$ pnpm run deploy dev
When it finishes, SST prints your app's CloudFront URL. To verify the moderation, upload a regular photo and one with a phone number written on it: the first gets published and the second gets rejected. To open the panel, add { "role": "admin" } to your user's Public metadata in the Clerk dashboard.
When you're done, remove everything with:
$ npx sst remove --stage dev
The README covers the production variables, custom domains and costs.
As for my friend, she used Freebie Binder in Chile and came back with some great freebies.
Keep coding and learning!
Have more questions? Leave them in the comments.
Resources
Comments
Join the discussionNo comments yet. Be the first to comment.